Continue Pages Through Section Breaks Microsoft Word
Section breaks are probably one of the most useful features in Word when you are formatting complicated documents. They allow you to change formatting aspects that would otherwise be the same throughout a document, such as page orientation, margins, columns, headers and footers.
Column changes (2, 3 or more columns) need Section Breaks before and after. A document in portrait orientation can have a Section Break to switch to landscape.
Inserting a Section Break
To insert a section break, click where you want the break to occur, and go to Layout | Page Setup |Breaks. You will see that there are four different types of break to choose from.
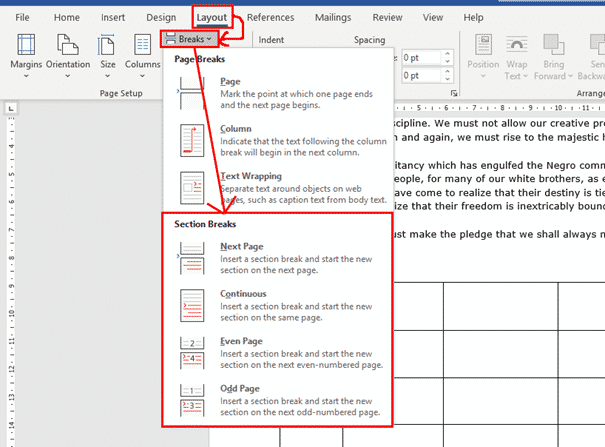
Continuous Section Break
Possibly the most common section break is the continuous or invisible section break.

A continuous break will start your new section on the same page. This allows you to do things like:
- Have different numbers of text columns on the one page. Word will normally add continuous section breaks automatically when setting columns.
- Have different margins on different sections of the same page.
In the example below, I have kept the regular page margins for the text part of the document, but added a continuous section break so I can reduce the margins on the lower part of the page to give my table a bit more room. (After the table, I would then need to add another continuous break to go back to the regular margins for the next part of the document.)

Continuous Section Breaks are useful to add invisible dividers within a document.
Next Page Break

The Next Page break does exactly what it says on the box – starts your next section on a new page. It's very similar to a regular page break, except that it allows you to change other page layout and formatting options in the new section.
Even and Odd Page Section Breaks

These options allow you to format your text for printing in book format, and choose whether your section will start on the left or right page of the book. In a standard book format, odd numbers are usually on the right-hand side, so if you want your new section to start on the right-hand page, select an Odd Page section break.
Page Numbering and Section Breaks
When starting a new section on a new page, there are two options for how you want the page numbering to work:
- Start the page numbering again in the new section.
- Continue the page numbering from the previous section.
To set this, put your cursor somewhere after the section break, and go to Insert | Header & Footer | Page Number | Format Page Numbers.

In the bottom part of the Page Number Format dialog, select whether you want to continue the numbering from the previous section or start the numbering again. The default for restarting the numbering is to start back at 1, but you can also choose to start your section page numbering at any number you wish by using the spinner or typing a number in.

Headers & Footers with Section Breaks
By default, when you set up a header or footer for your document, it will display the same on every page of the document. We don't always want this though; we may want different information in each chapter, or we may want no header or footer on the title page or contents pages, for example.
When setting different headers and footers, the thing to remember is that you are setting what happens to this header/footer compared to the one in the previous section. So again, we need to put our cursor somewhere after a section break. Then double-click within the header or footer to select it, and you will see the Link to Previous button under Header & Footer | Navigation.

This button is usually selected, as the default is to have the same headers and footers throughout. If you want your new section to have a different header/footer, just click the Link to Previous button to deselect it. Then you can make any changes you want to the header/footer, and they will only apply from that point onwards. Any header or footer before the section break will not be affected by changes you make here.

Once you have unlinked each of your sections' headers and footers from the previous section, you can then edit them independently in each section. If you already have a header/footer throughout your document and you want it removed from the title and contents pages at the beginning, you would:
- Put a section break at the beginning of the first page that you want to retain the header/footer.
- Unlink the header/footer from the previous section.
- Go back to the first section and delete the header and footer. As you have unlinked the sections, the deletion will only apply to the first section.
Deleting a Section Break
It's easiest to delete a section break if you can see it, and to see it you need to turn on Show Hidden Characters under Home | Paragraph.

Now you can see the section break, just click at the beginning of the section break line and click Delete.

Two ways to make Word remember your preferred font
Merge or Split cells in Word tables
Paste tricks and tips for Microsoft Word
Flowing column text in Word with break-out or sidebar
Source: https://office-watch.com/2020/section-breaks-in-microsoft-word/
0 Response to "Continue Pages Through Section Breaks Microsoft Word"
Post a Comment